Introduction
Dentistry is becoming increasingly digital, even though currently only a minority of our profession is working this way. Be it chairside systems, orthodontic aligners, guided surgery or the manufacturing of crowns, bridges and even removable prostheses, the topic of digital impressions is an important part of the discussion. You are most probably wondering if you should get an intraoral (IO) scanner for your clinic or, if you already have one, you might be wondering how to make better use of it. Industry takes a rosy view of new developments, but as with all technology, IO scanners have their pros and cons. In this series of articles, I will try to provide answers to most of the questions that bugged me when I started using IO scanners and I will give you some practical tips and tricks on how to get better scanning results.
Let’s dive in and see what’s possible and what we need to keep in mind to deliver the highest possible quality of work to our patients.
Patient-related pros
I’d like to start with the people who are most involved – our patients. IO scanners bring many positive points to the dental visit experience. It’s not only about having a new piece of equipment. This equipment shows patients that their dentist is developing and investing in his or her skills as well as tools to improve treatment quality. This psychological factor is not to be underestimated and may bring more dynamic to your clinic or provide a stronger relationship with your existing patients.
Technology will also come as a great relief to those, who have a strong gag reflex or had unpleasant impression-taking experiences in the past. Being able to show patients their own teeth on the screen right away is also a great way of communicating with them. It allows you to explain restorative limitations like crossbite, the post-extraction changes in a dental arch (like the Popov–Godon phenomenon), crowding, erosion or attrition of teeth.
With some IO scanners you might take intra-oral pictures to show a specific area on a live image, not just on the 3D reconstruction. Others provide caries detection systems to maximize the efficiency of patient chair-time and provide a dental check-up tool as well. Some scanners allow you to create a Digital Smile Design (DSD) set-up swiftly to visualize the direction in which you’d want to be heading with the treatment and check with the patient’s expectations within a few minutes, even at the first appointment. All in all, patients typically appreciate their experience with IO scanners.
What is the IO scanner saving for you?
Buying an IO scanner is one of bigger investments if you have already set up your practice. It will bring savings over time, but you need to remember that the license fees usually represent an annual cost. Some companies also charge for data export if you want to keep the files you’ve scanned on your computer or on the company’s server (an additional data storage alternative is necessary as the scanner will get slower if you store too much data on it).
At first glance, the most visible savings an IO scanner can provide would be the impression masses and stone casts. Does a scanner release you from all conventional impressions? Certainly not, but it will cut down on the amount of impression mass you’re using on a daily basis. You’re not tied to stone cast pouring any more either. For those dental clinics that have a lab on-site, it means spending less on materials. For most clinics cooperating with labs in the same city, it saves the transportation and models cost. Finally, for some clinics operating in smaller towns it allows for the possibility of scheduling prosthodontic work with regard to their individual convenience. Work can always progress, regardless of the nearest lab’s operating times or weekend coming up.
There are cases when classical impressions are inevitable in order to provide the best quality of work to our patients. This includes highly mobile mucosa in the edentulous mandible and multiple implant impressions (unless we have additional digital equipment to help the IO scanner – find out more about multiple implant digital impressions in the upcoming articles in this series). As with any other tool, the IO scanner is great, when used for the right applications.
Shortening the chair-time spent on procedures with an individual patient will also free up your schedule, allowing you to do more restorations or use the additional time for other purposes. It’s not necessarily about the scanning time vs. impression-taking time. Often, you will find that in cases of missing mandibular lateral teeth, especially with highly mobile mucosa, it may be faster (or only possible) to take an alginate impression and scan it, or scan a model, rather than fight for that IO scan for 45 minutes.
There’s more to it than shortening the patient’s chair-time however: by scanning instead of impression-taking you’re shortening the lab workflow. You’re able to provide color information, pre-op scan and prep scan, mark the chamfer and define which material you need for the restoration as well as when is it due. The next appointment can be crown delivery, aligner delivery or guided implant surgery, with a delivery of an immediate, lab-made crown. The lab doesn’t have to pour the stone casts and they’re able to start working right away on creating the design of the restoration.
Patient monitoring and models
Scans of your patients registered over a longer time span will allow you to monitor the progress of changes in dentition or the effects of your work and stability of treatment (such as attrition and chipping, stability of orthodontic treatment, tooth migration), which again allows for enhanced patient communication and education. By keeping 3D models in your data storage, you free up space in your clinic. Even if you set up a back-up server to store the patient data, it won’t take up as much storage space as a locker full of stone casts. If you later require a physical model of your patient, you can always manufacture it from the data, using for example 3d printing technology. This means that breaking a stonecast would no longer be a problem. Additionally, your implant analogs and impression copings are not frozen until you deliver and control the prosthodontic reconstruction, and assistants do not spend as much time looking for the right box or releasing and cleaning the impression copings and implant analogs.
Scanning accuracy
Here’s where the fun begins: Why buying an IO scanner is only the beginning of your problems, and not the golden solution to all of them. In my opinion this is because of false expectations and inadequate reality checking.
Producers of IO scanners compete over the scanning accuracy, fluency of scanning and additional features of their equipment. The data provided by companies typically show the best possible achievable result for their product. That means testing is typically performed in a standardized manner on something that is easily “scannable”, like a plaster model. Yes, you can achieve accuracy even under 6 µm when scanning a perfect prep on a perfect model, preferably also covered with a scanning spray, or poured using scanning-friendly material. This is a great number if we consider that our Shimstock occlusal foils are 8 µm thick. That, however, is not how you will use the IO scanner and it can be very frustrating to see results that consistently differ from what you are expecting.
What issues can be expected and how to solve them:
A surface/color is not scanning
Here’s the reality check. There are many different surfaces in the mouth. Typically, the scanners struggle if the surfaces they need to register are wet (thicker layer of saliva, blood), very shiny (highly polished metal fillings/reconstructions), sometimes if they’re very dark (corrosion products of metal reconstructions/amalgams, discolorations, caries), or simply deeper in the image/in an undercut (narrow interdental gaps, emergence profile, deep chamfers).
There are a few ways to get around the above. First, try to keep the scanning area dry. You’ll quickly realize that you don’t need to constantly blow-dry the teeth, small amounts of low viscosity saliva (like after the cheek touching a tooth) won’t cause problems. If you do however find an area hard to scan, be it an undercut, emergence profile or inflamed papilla, dry it and the scanner will pick up more details. If the result is still not satisfactory, a handy can of scanning spray usually helps. Even though theoretically the undercuts or interproximal surfaces depend on the depth of scanning achievable by the handpiece of the IO scanner, a scanning spray will help you to capture the tricky areas of the digital impression. The reason may be that the darker areas of those undercuts (shadows) are easier to pick up by the lens with the bright powder, and that the shiny interproximal areas become less reflective, at the angle you need to scan them. Regardless of the explanation behind it – scanning spray helps in areas that are hard to scan, even if your IO scanner is operating using powderless technology. Just remember to keep the spray layer as thin as possible.
Scanner memory and data storage
Every IO scanner unit is a computer and, as with every computer, maintenance is key. If we experience a decrease in scanning fluency or the system starts and processes very slowly, you may need more computer memory. Most producers make it possible to add more, of course, at a cost. Another solution is to keep your data neatly organized and to regularly remove patient data from the scanner computer. It is typically possible to record the 3D models on a pendrive, send them to a lab, move them to a patient record file on your clinic’s server (wirelessly if you connect the IO scanner to a network with other computers). Some scanners allow data storage on a cloud, however that often involves additional costs for cloud storage and downloading the actual 3D file from the cloud, should you want to work with a lab of your choice.
“Tricky scan areas”, mobile mucosa and clogged scanner memory will influence the fluency with which you’ll be able to perform the scan – the scanner could freeze while scanning, lose the scanning path, stop picking up the image often etc. As that’s the last thing we want to happen in front of our patients, it’s good to be ready for different scenarios, ensure the device memory is storing as little data as necessary, and have a few tricks up your sleeve. You’ll find my “quick fixes” below.
High mucosa mobility, cheeks, lips and tongue
Mobility of soft tissue can be truly troublesome for IO scanners. It’s not that the scanner can’t scan mucosa: it can, but if a piece of the puzzle your scanner is putting together moves, it will get stuck. Let’s say a small piece of mucosa in the cheek is recorded around the premolar/molar area of your scan. It is very likely that as you come back to that area the scanner will pick up the surface of the teeth until it records the area with the piece of mucosa again, where it will get stuck again. The reason is that the mucosa likely changed position and now the scanned image (new piece of puzzle) doesn’t match those previously scanned. If you continue, the scanner will continue to get stuck again and again and at some point it’s likely to create more distortion. The easy fix is to use the scan trimming tools provided by the manufacturers. Pause the scan, cut out the areas of mucosa that were recorded in the problematic spot, and try again.
A general way to get your patient scanned swiftly and correctly first-time round is to prepare for your scans. There are a variety of tools that will help you with that, like plastic or rubber retractors, wooden spatulas etc. In my experience, black gloves also help. Black is not picked up by the scanner as quickly as other glove colors, so you can use your finger as a retractor as you move along the arch with the scanning tip. If the mucosa is highly mobile, then it helps to use a one-piece retractor from the start. It will hold the tissues away from the arch, applying tension to the frenulum to provide you with scannable reference points on the scan surface.


Color varies in different scan areas
When using the automatic color matching functions, you need to remember that the color recorded on the scan depends on the surrounding light. If you scan with an additional light source (dental unit lamp for instance), the scanner will record a different color in the areas that the light reaches easily, and another (more realistic) where only the scanning handpiece light illuminates the image. To avoid this additional complication, simply turn off the other light sources – the handpiece has enough light power to scan the surfaces correctly.
Scan distortion
IO scanners record a mirrored image (in the form of single pictures superimposed on each other or a video recording) through an inbuilt lens. They then post-produce the images and construct an instant 3D model of the scanned surface. This makes it possible to minimize the size of the scanning handpiece, but also creates distortion. Think of it like taking a panoramic picture of a room with your phone. Like the scanner, your phone will take single pictures and link them to each other to build the final panoramic shot. Each picture is stitched to the next by finding those places that are alike and merging the parts that match. On a longer scanning path, however, this can create small mistakes that accumulate, creating distortion of the 3D model of your patient. The reality is that even when using IO scanners from leading companies, a full arch scan can lead to distortions of 1 mm and you will never know in which direction. Scary? But wait…why does it work at all?
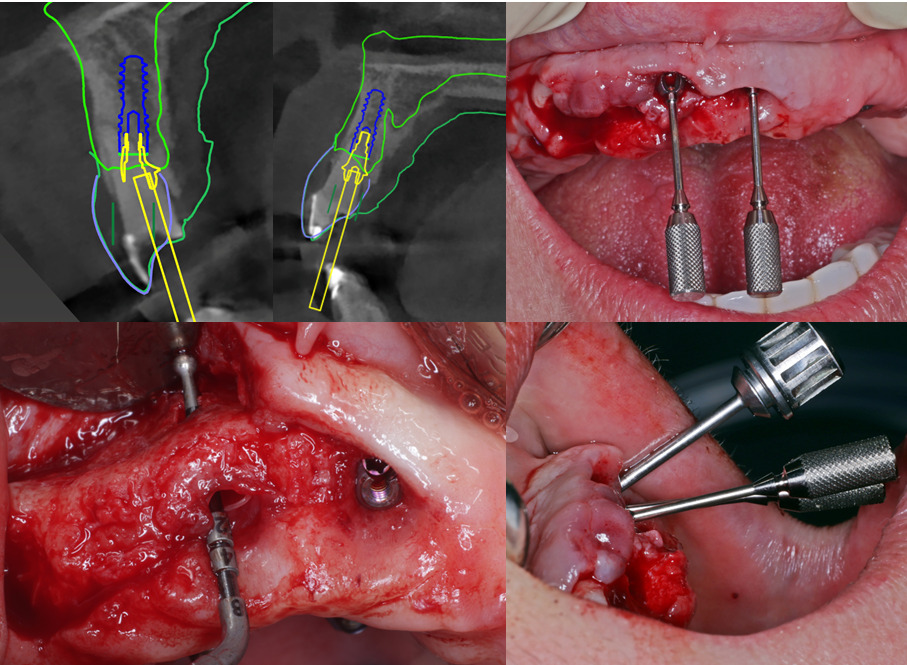
Small prosthodontics work because you’re most likely scanning the area you’re interested in as well as the adjacent teeth or a quadrant only. Big prosthodontics work, because you’ll adjust the contact points, and the teeth have a bit of leeway to move in the periodontal ligament. The aligners and drill guides work because of the offset – typically about 150 µm of spacer around all the surfaces of the arch. That gives us 300 µm on the buccal and lingual aspect of a molar on each side of the arch. That spacer, along with the natural mobility of the teeth is sufficient to compensate for the distortion. You are not likely to notice. The distortions are visible if you superimpose two scans, in CAD/CAM software. When will you start to notice that something is wrong? In implant prosthodontics.
Summary
IO scanners can bring a lot of value to your clinic, but as with any other tool, there’s a learning curve. Hopefully some of the tips and tricks from my experience will come in useful, whether you’re a bit frustrated with your existing IO scanner, or aiming to buy an IO scanner in the near future. In the upcoming articles, I’ll be dealing with bite scans and implant impressions, and we’ll talk some more about scan distortions.
For further references, check out the following content pieces on the ITI Academy: